The problem
Every order needs a packing slip. Someone has to log into Shopify, find the order, print it, and match it with the right package. Do that 50 times a day and it gets old fast.
And Shopify's default packing slips are... fine. But they don't have your branding, can't show gift messages, and don't include barcodes for scanning.
We're going to fix both problems. You'll create a custom packing slip template, connect it to Shopify, and have it print automatically when orders come in.
What's on a packing slip?
For the warehouse
- • Order number (often with barcode)
- • SKU codes for each item
- • Quantities to pick
- • Checkboxes for verification
- • Bin locations (if applicable)
For the customer
- • Their name and shipping address
- • List of items in the package
- • Gift message (if applicable)
- • Return instructions
- • Your company branding
Create your packing slip template
1.1 — Choose a template
I'll use one of our packing slip templates. You can also build one from scratch if you have specific requirements.
- Go to Templates
- Filter by Packing Slip
- Pick one and click Use Template
Want to test first? Try the free packing slip generator with your own data.
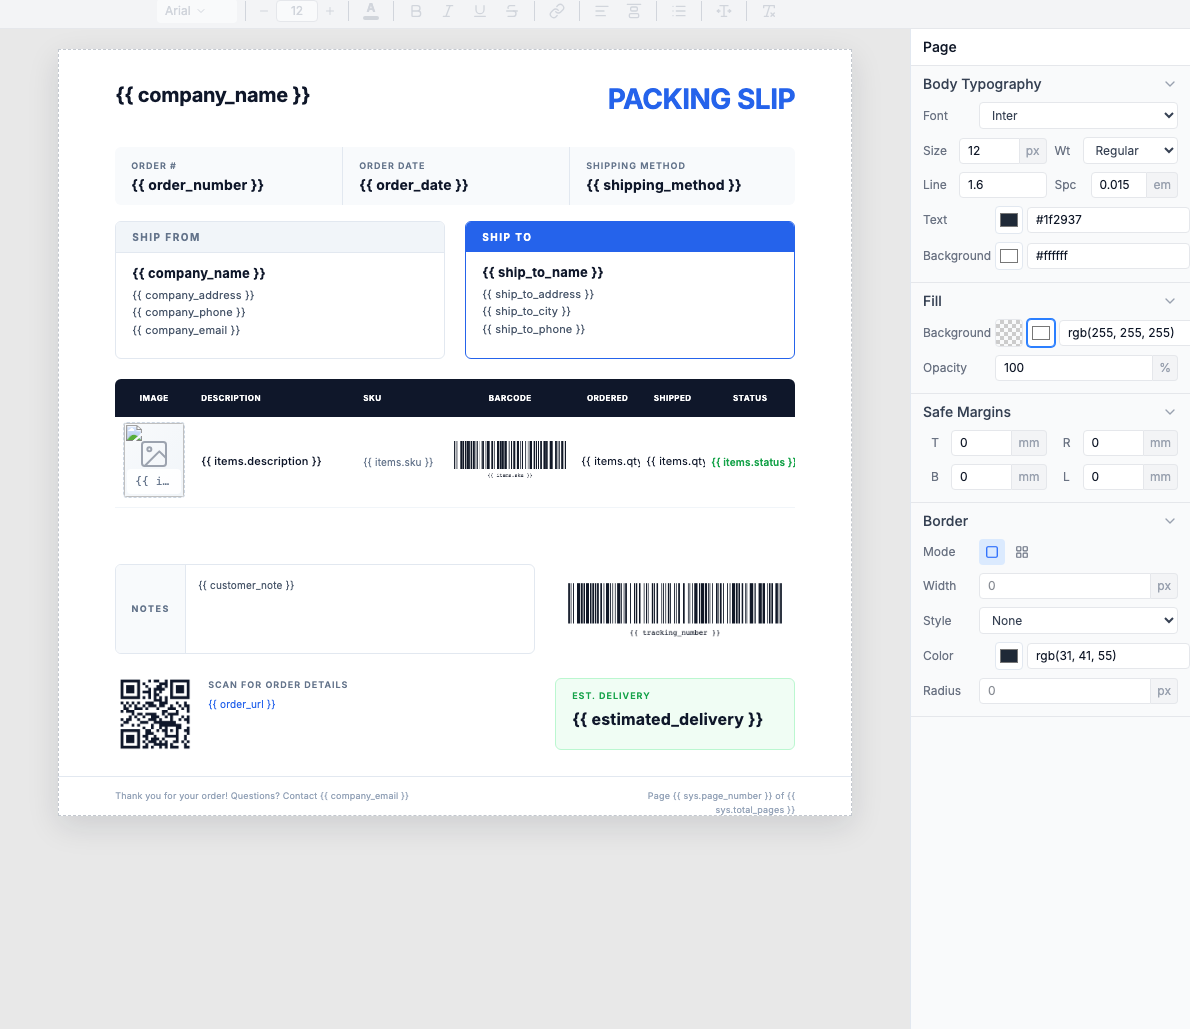
1.2 — How the template works
Some things stay the same on every packing slip (your company name, return address). Others change per order (customer name, items). Here's how that breaks down:
Hardcode once (your company)
company_name— Your business namecompany_address— Your warehouse addresscompany_email— Support emailcompany_phone— Support phone
Edit these directly in the template — they stay the same for every order.
Dynamic from Zapier (per order)
order_number— Order ID (e.g., TS-2026-00847)order_date— When order was placedship_to_name— Recipient nameship_to_address— Street addressship_to_city— City, state, zipitems[]— Line items arraycustomer_note— Special instructions
The line items table
The table expands automatically. If an order has 3 items, you get 3 rows. 10 items, 10 rows.
Picking checkboxes
Add a checkbox column to your items table for warehouse staff to mark items as picked. Use the Unicode checkbox character or a simple empty box:
Customize barcodes and QR codes
The template includes scannable codes for quick order lookup. To customize them, simply click on the barcode or QR code in the canvas:
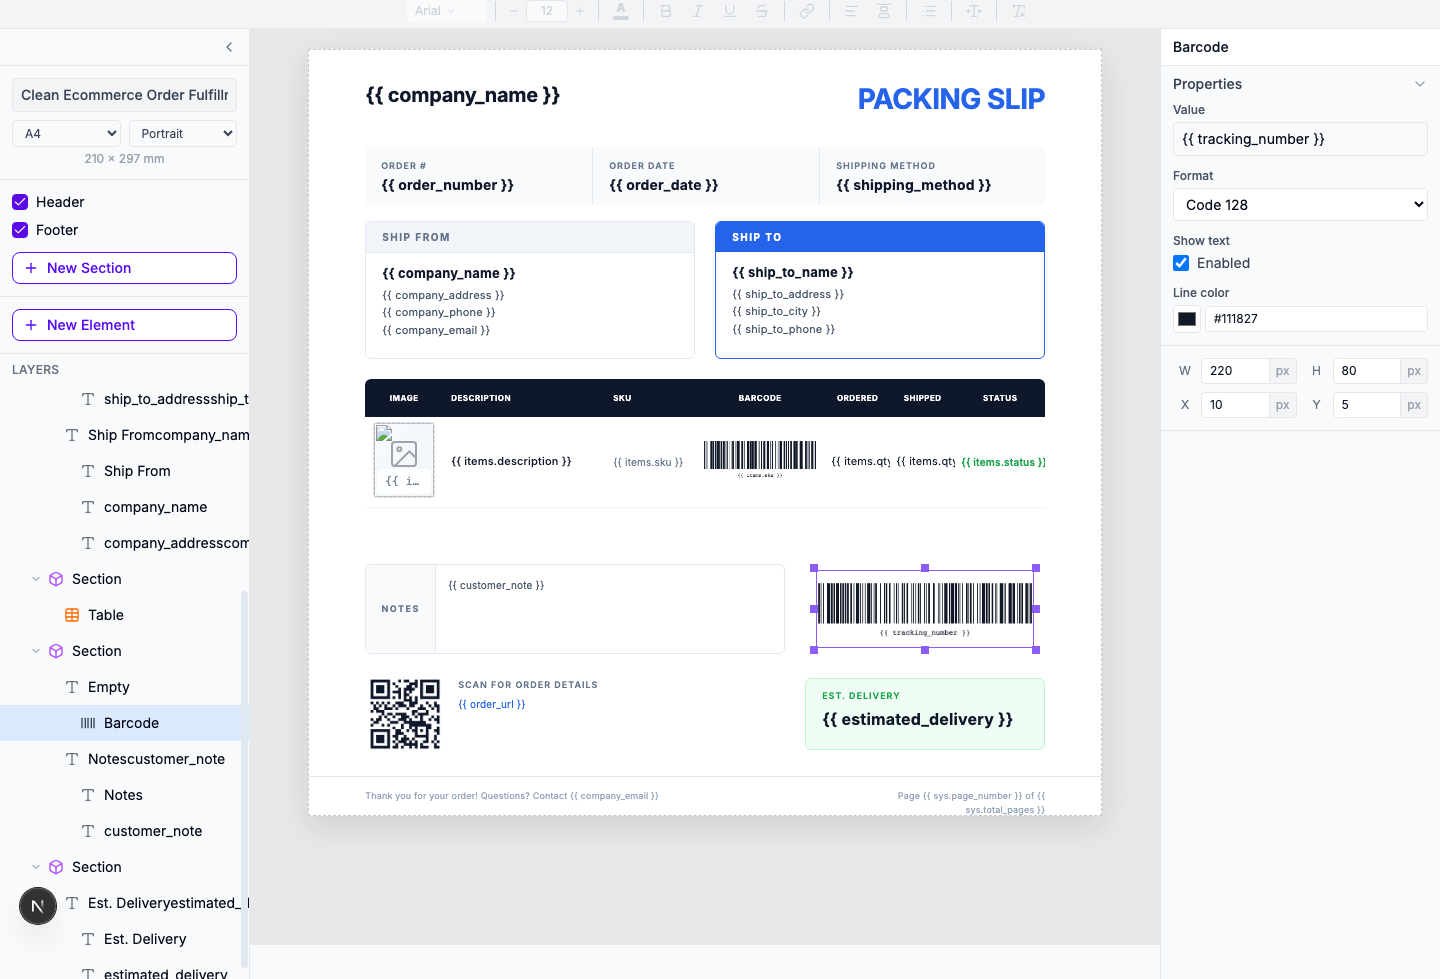
Click on the barcode/QR — The element is highlighted and handles appear.
Edit in the right panel — Change the Value (variable), Format (Code 128), Show text, and dimensions.
Tip: QR codes can store more data than barcodes. Use them for URLs (like {{qrcode:order_url}}) or tracking links that staff can scan with their phone.
Learn more: Data binding · Barcodes · Tables
1.3 — Test it
Before connecting Zapier, make sure the template looks right. Click the Preview tab and paste in some test data.
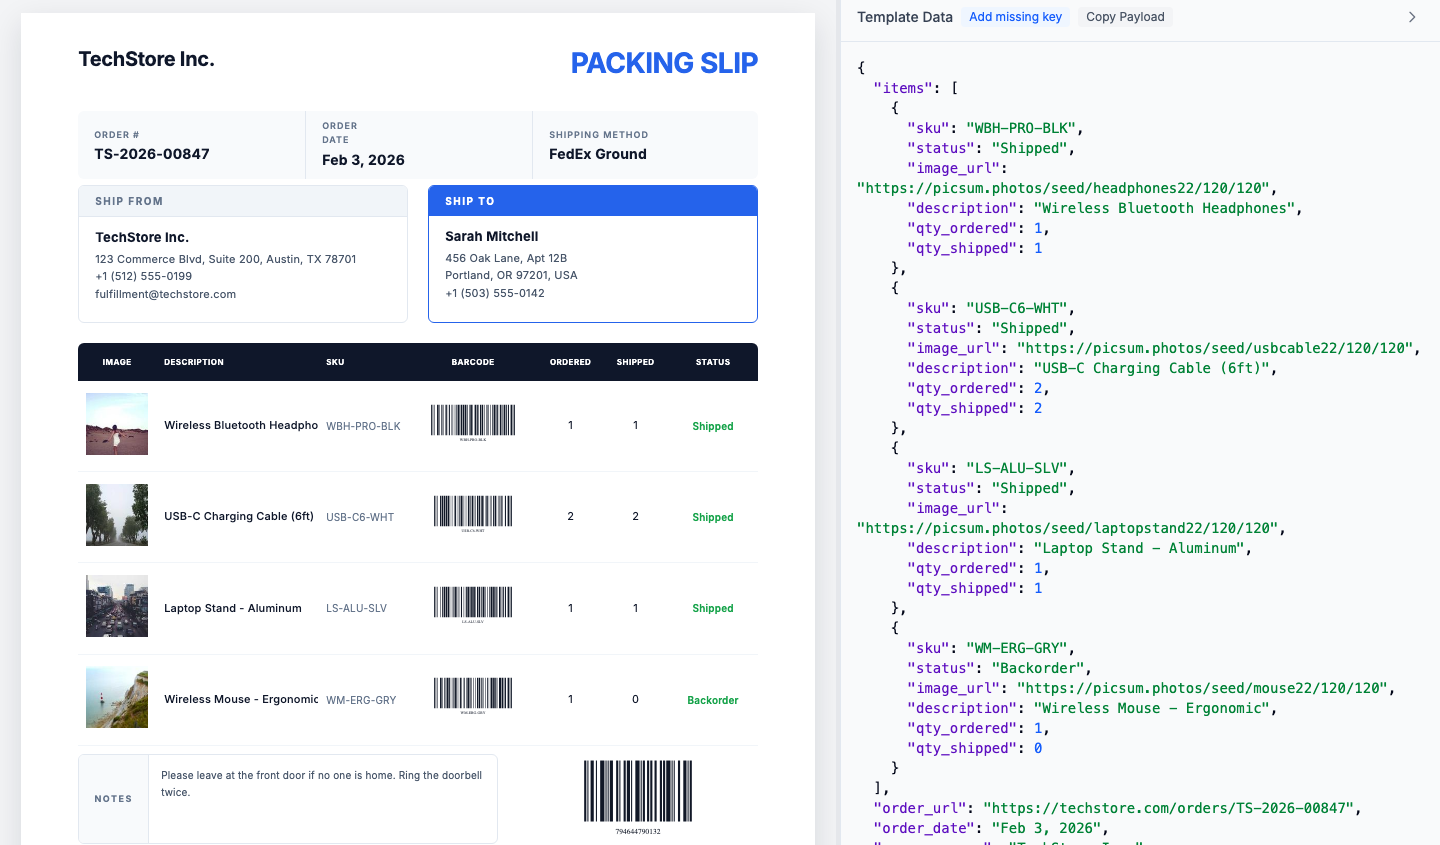
JSON data maps to template fields
Each key in the JSON (like order_number) fills its matching {{order_number}} placeholder.
Line items array becomes table rows
The objects in the items array generate one table row per product.
Barcode renders from order number
The {{barcode:order_number}} syntax generates a scannable barcode.
Tip: Use the Copy Payload button to copy the JSON structure. This is the exact format you'll need to send from Zapier.
View full JSON payload example
Connect with Zapier
I'm using Shopify for this tutorial, but the same approach works with WooCommerce, BigCommerce, or any platform that has a Zapier integration.
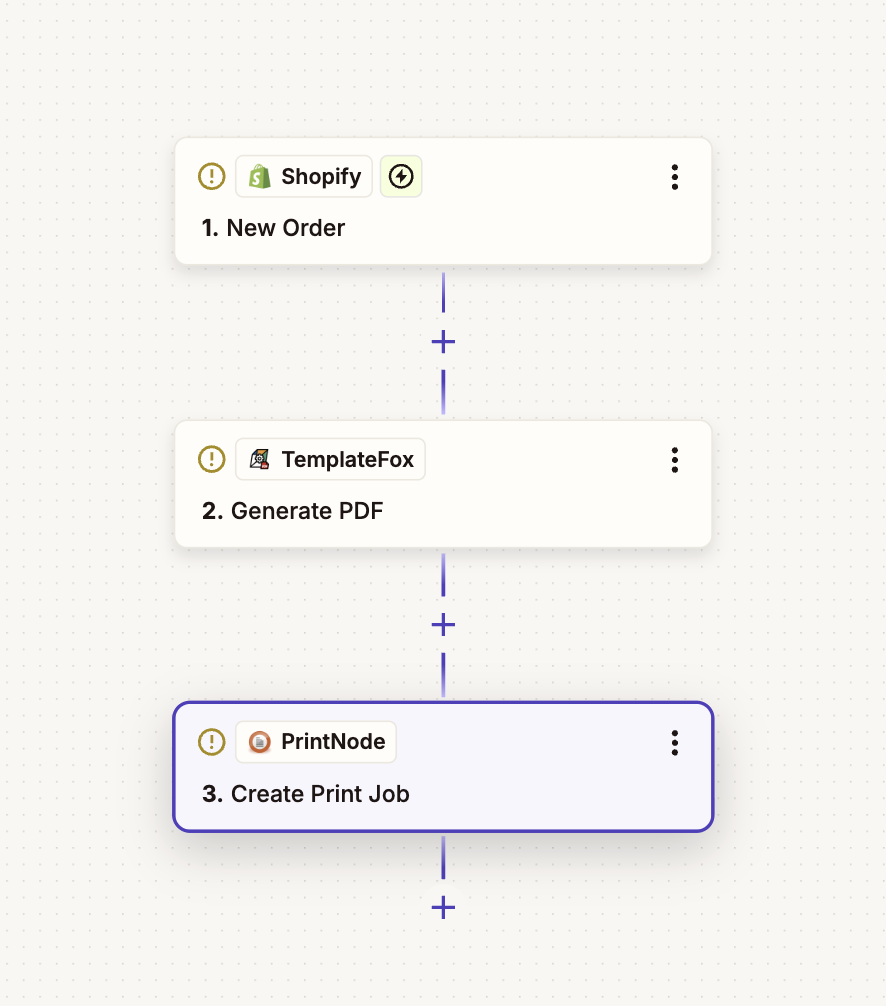
2.1 — Set up the Shopify trigger
- Go to zapier.com and create a new Zap
- Search for Shopify
- Pick New Order as the trigger
- Connect your store and test — Zapier should pull a recent order
Shopify gives you everything you need: order number, shipping address, line items, customer notes.
2.2 — Map the line items
Shopify sends line items as an array. Here's how the fields map:
| Template | Shopify |
|---|---|
items.sku | Line Items SKU |
items.description | Line Items Title |
items.qty_ordered | Line Items Quantity |
items.image_url | Line Items Image Src |
You don't need to loop or do anything special — the table expands automatically for each item in the order.
2.3 — Add the PDF action
- Add an action and search for TemplateFox
- Pick Generate PDF
- Connect your account (you'll need your API key)
- Select your packing slip template
- Map the Shopify fields to your template variables
- Test it — you should get a PDF URL back
Get it to the warehouse
Now you have a PDF. Here are a few ways to get it to your warehouse team:
3.1 — Email to warehouse
Send the packing slip to a shared inbox that your warehouse team monitors:
- Add an Action: Gmail, Outlook, or SMTP
- Set recipient:
warehouse@yourcompany.com - Subject:
New Order #{{order_number}} - Ready to Pick - Attach the PDF URL from the TemplateFox action
Tip: Create an email rule to automatically move these to a "To Pick" folder or flag them for quick access.
3.2 — Auto-print
This is my favorite option. The packing slip prints automatically at the warehouse as soon as the order comes in.
- Set up Ezeep or PrintNode on your warehouse computer
- Connect it to Zapier
- Add a Print Document action
- Pass the PDF URL from the previous step
Order comes in, packing slip prints. Your warehouse staff just grab it and start picking.
3.3 — Save to Google Drive
Archive packing slips in a shared folder for records and auditing:
- Add an action: Google Drive → "Upload File"
- Select a shared folder (e.g.,
Orders/Packing Slips/2026) - File URL: PDF URL from TemplateFox
- Filename:
PackingSlip-{{order_number}}.pdf
Other platforms
I used Shopify for this tutorial, but this works with any platform that has a Zapier trigger: WooCommerce, BigCommerce, Etsy, Squarespace, Wix, Amazon, eBay, Magento. The setup is nearly identical — just use their "New Order" trigger instead.
